When moving from traditional web hosting to managed platform-specific hosting providers like Pantheon, there are often a few tricks you'll need to work around. In this post I'll be documenting the steps necessary to move an existing website onto Pantheon.
Step 1: Create a new website on Pantheon
As someone who manages dozens of websites, I love Pantheon's upstreams. Whenever there is a security update for Drupal core or for Backdrop core, the provided one-click core update saves me a lot of time. Whenever I start a new Pantheon project or moving an existing site onto Pantheon, I want to start from an upstream.
I'll start by creating my site from Backdrop's Pantheon upstream.
I also like to run the installer to get a working Backdrop site (you'll see why later). I will replace various parts in the steps that follow.
Once my site has been created, I grab the Git information from the pantheon dashboard for the dev site, and clone the Pantheon codebase down to my local computer.
Step 2: Get your codebase ready
The site I am moving today includes a handful of contributed and custom modules, two themes (a base theme and a sub theme) and some custom layouts.
Add modules, themes, and layouts
I copied my contrib projects into the modules, themes, and layouts directories within the cloned codebase. Once everything I needed was accounted for, I committed, and pushed new code up to the dev site.
Add any core patches.
The site I am moving today also includes a core patch. Fortunately, I have this well documented in my PATCHES.md file, so I'm able to wget the patch, apply it to my codebase, and commit the change, and push new code up to the dev site.
Add developer documentation.
Applying the patch reminds me that I also need to include the PATCHES.md file in the codebase, so I copy it into the webroot and commit it there also.
On another host, I'd usually leave this file outside the webroot to keep it away from prying eyes. Fortunately, Pantheon provides a protected_web_paths option in the pantheon.yml file that I can use to block access to this file.
I edit the pantheon.yml file and add the following:
protected_web_paths:
  - /files/private
  - /PATCHES.md
You'll note that I've also included /files/private from the pantheon.upstream.yml. These files were protected before I defined protected_web_paths in my pantheon.yml, but when I override that upstream setting it needs to be included again. It's important that those private files stay private!
Update the settings.php file
I recommend starting with the settings.php file provided by Pantheon for your site, and modifying as necessary. Pantheon will add the database connection information for you, so we can skip that step, but you'll need to update some other sections.
Backdrop sites include the trusted_host_patterns setting, and that will need to be adjusted for Pantheon. I add my domain names as usual, but I then follow that with some code to handle the Pantheon internal URLs for dev, test, and live.
if (isset($_ENV['PANTHEON_ENVIRONMENT'])) {
  if (in_array($_ENV['PANTHEON_ENVIRONMENT'], array('dev', 'test', 'live'))) {
    $settings['trusted_host_patterns'][] = "{$_ENV['PANTHEON_ENVIRONMENT']}-{$_ENV['PANTHEON_SITE_NAME']}.pantheonsite.io";
  }
  else {
    $settings['trusted_host_patterns'][] = '.*';
  }
}
Step 3: Set up configuration workflow
I like to keep Backdrop configuration files in version control for quick and easy deploy between environments. On a Pantheon site, this requires a little extra set-up.
Add versioned configuration files (staging)
Due to some limitaitons on the Pantheon platform, the only place the active configuration directory can be placed is within the files directory. This is the only place the server has access to write files, so this is where Backdrop puts it's configuration files by default.
I like to keep my active configuration separate for each instance, so I add some additional code to the settings.pantheon.php file to separate out those directories.
if (defined('PANTHEON_ENVIRONMENT')) {
  if (PANTHEON_ENVIRONMENT == 'dev') {
    $config_directories['active'] = 'files/config/dev-active';
  }
  else if (PANTHEON_ENVIRONMENT == 'test') {
    $config_directories['active'] = 'files/config/test-active';
  }
  else if (PANTHEON_ENVIRONMENT == 'live') {
    $config_directories['active'] = 'files/config/live-active';
  }
}
Nothing in the files directory should be versioned, so because I like to version control my site's configuration, I need to move the staging configuration directory outside the files directory.
I usually place mine in a directory named config along side the files directory. Below is an example of the files and directories in my webroot.
LICENSE
PATCHES.md
README.md
config/local-active/..
config/staging/..
core/..
files/config/dev-active/...
files/config/test-active/...
files/config/live-active/...
index.php
layouts/..
modules/..
pantheon.upstream.yml
pantheon.yml
robots.txt
settings.php
settings.pantheon.php
sites/..
themes/..
In order for Backdrop to look in this new location for the staging configuration files, I'll also need to update settings.pantheon.php to match:
/**
 * Site configuration files location.
 * - All sites use the same staging directory, but unique active directories.
 * - Staging lives outside the web root. Not web-writable, managed by Git.
 * - Active lives inside the files directory. Web-writable. Not managed by Git.
 */
$config_directories['staging'] = 'config/staging';

if (defined('PANTHEON_ENVIRONMENT')) {
  if (PANTHEON_ENVIRONMENT == 'dev') {
    $config_directories['active'] = 'files/config/dev-active';
  }
  else if (PANTHEON_ENVIRONMENT == 'test') {
    $config_directories['active'] = 'files/config/test-active';
  }
  else if (PANTHEON_ENVIRONMENT == 'live') {
    $config_directories['active'] = 'files/config/live-active';
  }
}
To keep eyes off the staging config files, I'll also add this new config directory to the list of protected_web_paths in pantheon.yml:
protected_web_paths:
  - /files/private
  - /PATCHES.md
  - /config
Step 4: Upload files
Because the active configuration files need to be placed into the files directory, I'll need to move them there before I can upload files from an existing site.
Download files from live site
I ssh into my current server, zip up the files directory, and then download it to my local computer. Once downloaded, I unzip it so I can add more files.
Get the name for the configuration directory
The name of my active configuration directory is determined by the database connection string, as defined in the settings.php file:
// Live config lives in the files dir so it can be web-writable.
$config_directories['active'] = 'files/config_' . md5($database) . '/active';
The easiest way to get the name of that directory is to run the Backdrop installer, and simply look at what it creates. This is why I ran the installer in step 1, even though I was eventually going to replace the code, files, database, and configuration.
On the pantheon dashboard for the dev site, switch the dev site to SFTP mode.
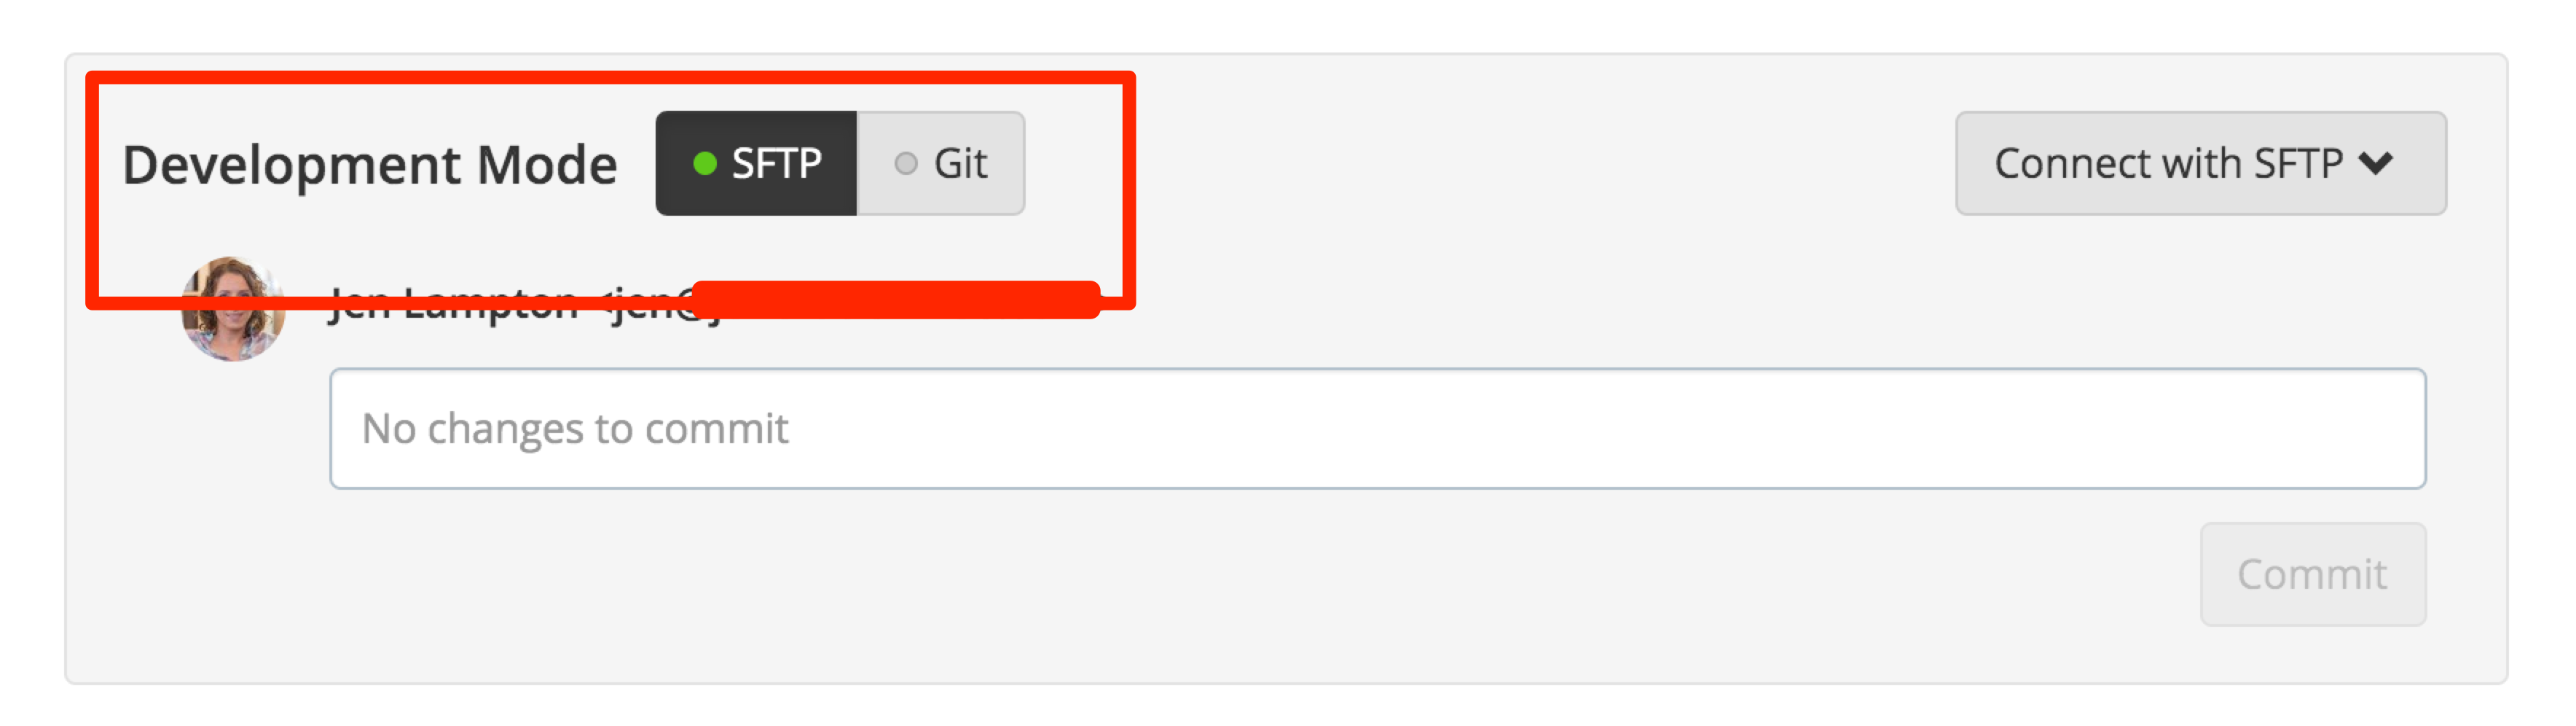
SFTP into your pantheon site using the provided credentials, and look inside the files directory for the name of your configuration directory. It will start with config_ followed by a long hash.
Note the directory name, then switch back to Git mode on the Pantheon dashboard.
Move the active configuration files
Next, I navigate to the unzipped files directory I downloaded from my live site.
I then create an empty directory within the files directory that has the exact same name I found via my SFTP adventure. I then create another new directory named active within that one.
Finally, I can copy the active configuration files from my live site into this new directory. The end result should be a path that resembles the following:
files/config_aa4aktcnfhudmhkzr4a6ce8tr/activeImport files using the Pantheon dashboard
Now that I have a files directory containing active configuration, I zip up files and use the Pantheon dashboard to upload these files to my dev site.
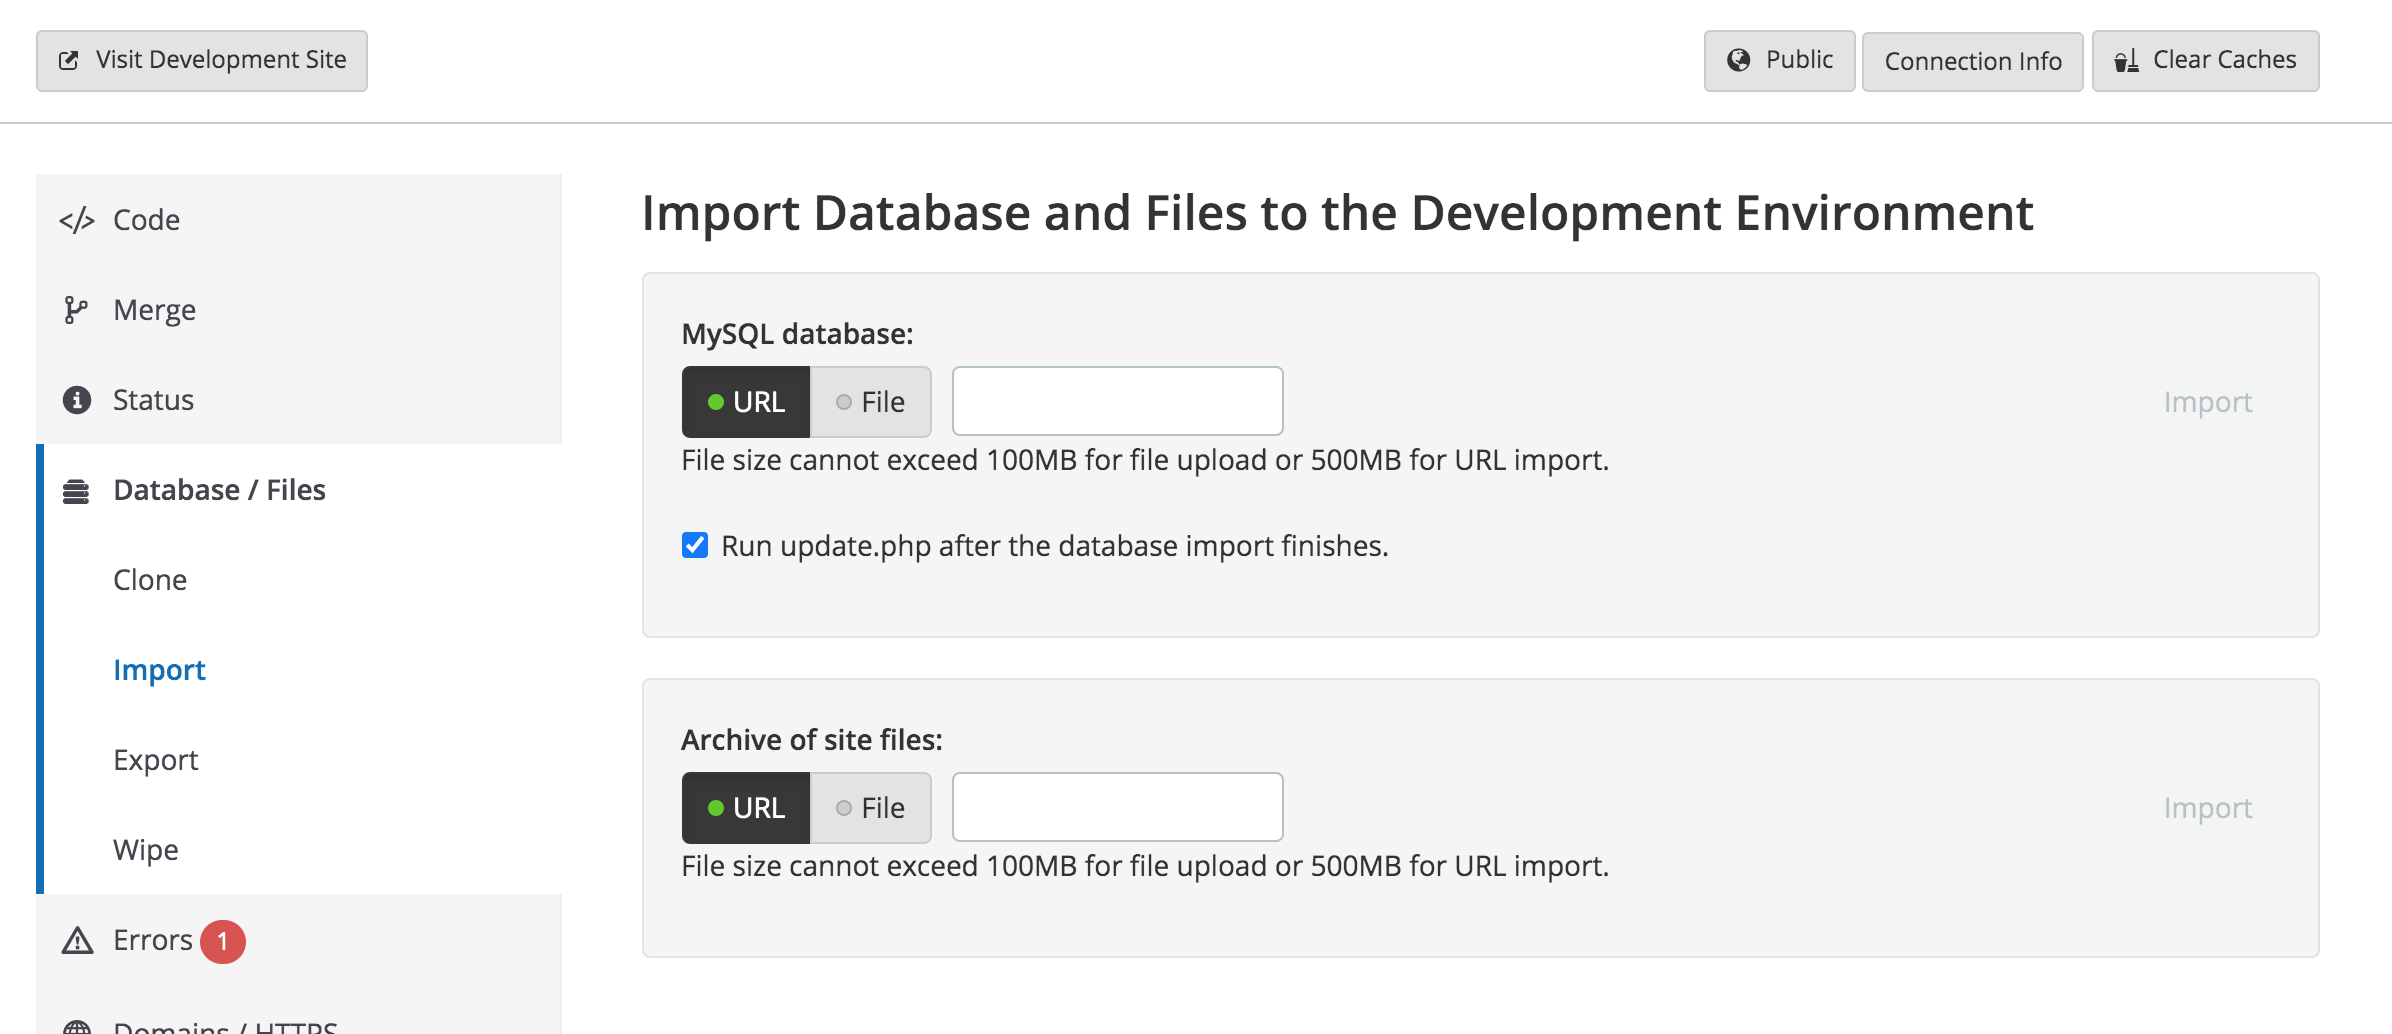
On the the Database / Files section of the Pantheon dashboard for the dev site, I can upload the zipped files directory. Once my zip has been uploaded, I click the Import button to the right of the upload.
Step 4: Upload database
Importing the database from my existing site was just as straightforward as I expected!
Dump database from live site
I ssh'd into my live server, and created a recent database dump from the live site, then downloaded it to my computer.
(Optional) Empty cache tables for a smaller archive.
I usually like to load this into my local site, clear all the caches, and create a second database dump from the local site to get a smaller database archive. Those cache tables take up more space than you think!
Import database using the Pantheon dashboard
On the the Database / Files section of the Pantheon dashboard for the dev site, I can upload the database archive. Once the database has been uploaded, I click the Import button to the right of the upload.
Step 5: Testing
Now that everything is up on Pantheon, it's time to visit my dev site, log in, and confirm everything is working as expected.
Step 6: Set up additional environments.
When I'm done testing, I can visit the "Test" tab, and click the button to "Initialize Test Environment". Once the test site is ready, I'll log in here too, and have another look around.
Next, I visit the "Live" tab, and click the button to "Initialize Live Environment". Once the live site is ready, I'll in here also, and have a final test drive.
Step 7: Launch
In order to launch a site on Pantheon, I'll need a paid plan. Then, on the the Domains / HTTPS section of the Pantheon dashboard for the live site I am able to add and verify my domain name.
Please see the pantheon docs for more details on launching a site.